Quick Start Guide
Get from download to your first storage analysis in minutes. This guide walks through every step using the Windows GUI app (recommended for first-time users).
PowerShell users: If you prefer the command line, see the PowerShell quick start at the bottom of this page.
Prerequisites
Before you start, make sure you have:
| Requirement | Details |
|---|---|
| Windows | Windows 10/11 or Windows Server 2016+ |
| .NET 10 Desktop Runtime | Download here (required for the GUI app) |
| PowerShell 7 | Download here (required for script execution) |
| SharePoint Admin | You need SharePoint Administrator or Global Administrator role |
| Entra ID App Registration | Recommended. Enables app-only (unattended) authentication — Setup Guide |
Authentication: Entra ID App vs. Interactive Login
Recommended: Configure an Entra ID app registration with a certificate. This allows the tool to authenticate silently (app-only) — no browser prompts, no MFA popups, and it works for scheduled/unattended runs.
Without an app registration: The tool falls back to interactive login. You will be prompted to sign in with your SharePoint Admin account every time you run the tool (every sync, every execution). This works for testing but is impractical for regular use.
Follow the Entra ID App Setup Guide to configure app-only authentication (takes ~10 minutes).
Step 1 — Download and Install
- Go to GitHub Releases
- Download the latest
.zipfile - Extract the ZIP to a folder (e.g.,
C:\Tools\SPOVersionManagement) - Install .NET 10 Desktop Runtime if you haven’t already
- Run
SPOVersionManagement.exefrom the extracted folder
You should see the Home screen with the navigation menu on the left.
Step 2 — Configure Your Tenant
Go to Config in the left menu.
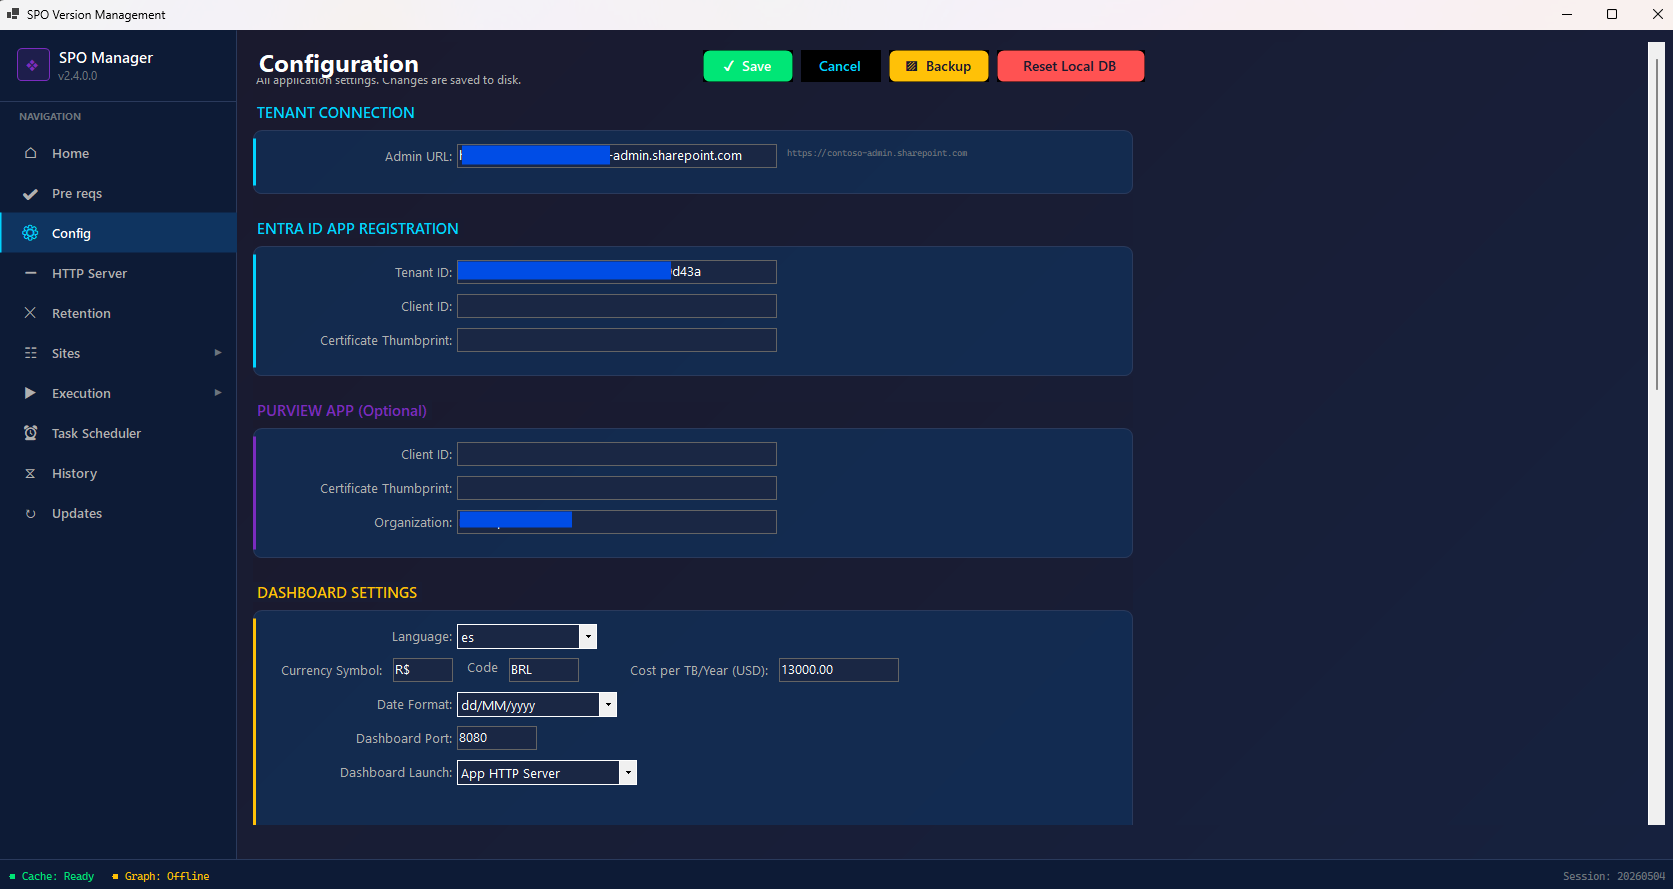
Fill in:
- Admin URL — Your SharePoint admin center URL
- Format:
https://YOURTENANT-admin.sharepoint.com - Example:
https://contoso-admin.sharepoint.com
- Format:
- Entra ID App Registration (for app-only authentication):
- Tenant ID — From your Entra ID app registration
- Client ID — Application (client) ID
- Certificate Thumbprint — The certificate you uploaded to the app registration
Need help? Follow the Entra ID App Setup Guide for step-by-step app registration instructions.
- Dashboard Settings (optional):
- Language — Dashboard display language (en, es, pt, de, fr, ja)
- Currency — Your local currency symbol and code
- Cost per TB/Year — Your Microsoft 365 extra storage cost (default: $13,000 USD)
- Click Save
Step 3 — Sync Your Tenant Data
Go to Execution → Data Sync in the left menu.
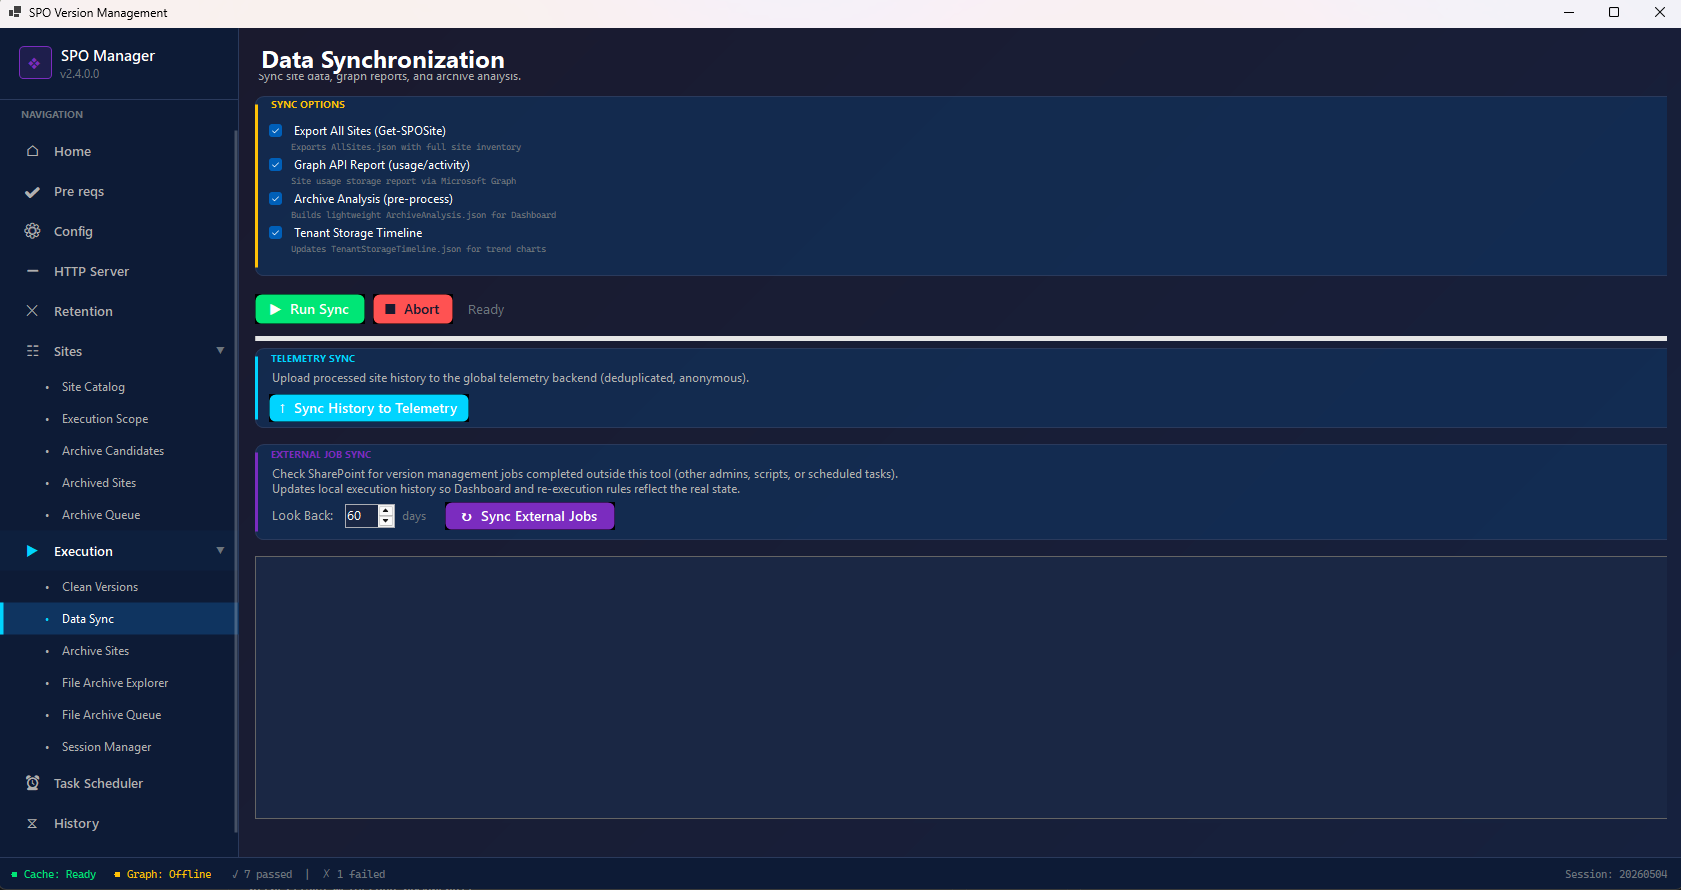
This step collects all the information about your SharePoint tenant:
- Check the sync options you want:
- ☑️ Export All Sites — Retrieves your full site inventory via
Get-SPOSite - ☑️ Graph API Report — Gets site usage and storage data from Microsoft Graph
- ☑️ Archive Analysis — Builds analysis data for the dashboard
- ☑️ Tenant Storage Timeline — Updates trend data for storage charts
- ☑️ Export All Sites — Retrieves your full site inventory via
-
Click Run Sync (green button)
- Wait for the sync to complete — this may take a few minutes depending on your tenant size
Large tenants (100K+ sites): The initial
Get-SPOSitecan take 30+ minutes. After the first sync, you can check “Use AllSites.json cache” on the execution screen to skip re-exporting and save time on subsequent runs.
Step 4 — View Your Dashboard
Go to HTTP Server in the left menu and start the local web server.
Open your browser and navigate to: http://localhost:8080
You will see your tenant dashboard with:
- Site list — All your SharePoint sites with version counts
- Storage metrics — Total storage, versions storage, potential savings
- Statistics — Charts and analytics about your tenant
- Archive candidates — Sites that could be archived
This is your read-only assessment — nothing has been changed yet.
Step 5 — Run Version Cleanup
Once you’ve reviewed the dashboard and understand your storage situation, go to Execution → Clean Versions.

Configure Version Policy
| Setting | Recommended | Description |
|---|---|---|
| Major Versions | 5 | Number of major versions to keep per file |
| Minor Versions | 0 | Number of minor versions to keep (0 = none) |
| Zero Version Action | Skip | What to do with files that have 0 versions |
| Re-execution Days | 60 | Skip sites processed within this many days |
| Concurrent Jobs | 100 | Number of parallel jobs (adjust based on throttling) |
Select Operation Mode
On the top-right corner, choose what to execute:
- ☐ Sync Version Policy — Pushes your tenant’s version policy to each site (including existing document libraries). Good for enforcing consistent version limits.
- ☑️ Delete Excess Versions — Deletes file versions that exceed your configured limit. This is the main cleanup operation.
- ☐ Manage Retention Policies — If sites are under retention hold, this temporarily suspends policies during cleanup (requires Purview app registration).
- ☐ Skip Graph — Check this if you don’t have Microsoft Graph permissions. You can provide the Graph report CSV manually instead (see How to Export the Graph Report below).
Input Files (Optional)
- Include Sites (CSV) — Process only these sites (leave empty to process all)
- Exclude Sites (CSV) — Skip these sites during processing
- Graph Report (CSV) — SharePoint Site Usage Storage report (only needed if you checked “Skip Graph”)
Execute
- Click Execute (green button, top-right)
- Monitor progress in the output panel and Site Progress section
- The tool processes sites in parallel, showing real-time status
Safety: SPO Version Management uses official Microsoft APIs (
New-SPOSiteFileVersionBatchDeleteJob). It does not access file content directly. It only removes excess versions beyond your configured limit — the current version and your configured number of retained versions are never touched.
Step 6 — Review Results
After execution completes:
- Go back to Data Sync and run another sync to update your dashboard
- Open the Dashboard (http://localhost:8080) to see:
- Storage freed
- Versions deleted
- Cost savings
- Per-site breakdown
- Optionally, click Sync History to Telemetry to share your anonymized results with the global community dashboard
What’s Next?
- Read the full manual — The Complete Tool Manual explains every screen, option, and feature with PowerShell equivalents
- Schedule regular runs — Use Task Scheduler in the left menu to automate cleanup on a schedule
- Monitor regrowth — The Tenant Storage Timeline chart shows storage trends over time
- Archive inactive sites — Use the Archive Sites feature to archive sites that are no longer active
- Set up retention handling — If you use Microsoft Purview, configure the Purview app registration for automated retention policy management
How to Export the Graph Report Manually
If you don’t have Microsoft Graph API permissions configured (or prefer not to grant them), you can export the SharePoint usage report directly from the Microsoft 365 Admin Center and provide it to the tool as a CSV file.
Step-by-step
-
Go to Microsoft 365 Admin Center (
admin.cloud.microsoft) -
In the left navigation, expand Reports and click Use
-
In the left panel under Reports, scroll down and click SharePoint
-
Click the “Use of websites” tab at the top
-
In the top-right corner, change the time period to Last 180 days (maximum available)
-
Find the third box labeled “Storage” (Amount of storage used)
-
Click the Export button (↓ icon) on that Storage box
-
Save the downloaded CSV file
Using the exported report
In the GUI:
- Go to Execution → Clean Versions
- Check ☑️ Skip Graph in the Operation Mode panel (top-right)
- In the Input Files section, set the Graph Report (CSV) field to the path of your downloaded CSV file
- Click the … button to browse for it
In PowerShell:
.\Start-SPOVersionManagement.ps1 -AdminUrl "https://contoso-admin.sharepoint.com" `
    -MajorVersionLimit 5 `
    -SkipGraph `
    -GraphReportCSV "C:\path\to\SharePointSiteUsageStorage.csv"
Why is this needed? The Graph report provides site-level storage metrics (total storage, file count, activity dates) that the tool uses for prioritization and dashboard statistics. Without Microsoft Graph permissions, the tool can’t pull this data automatically — but the same data is available as a manual export from the Admin Center.
PowerShell Quick Start
If you prefer the command line over the GUI:
# 1. Navigate to the tool folder
cd C:\Tools\SPOVersionManagement

# 2. Run a non-destructive assessment (sync data only)
.\Start-SPOVersionManagement.ps1 -AdminUrl "https://contoso-admin.sharepoint.com" -SyncOnly

# 3. Start the HTTP server and open http://localhost:8080 to view the dashboard
.\Start-Dashboard.ps1

# 4. Run cleanup — keep 5 major versions, delete the rest
.\Start-SPOVersionManagement.ps1 -AdminUrl "https://contoso-admin.sharepoint.com" -MajorVersionLimit 5

# 5. Unattended mode (app-only auth, for scheduled tasks)
.\Start-SPOVersionManagement.ps1 -AdminUrl "https://contoso-admin.sharepoint.com" -MajorVersionLimit 5 -Unattended
For full PowerShell reference, see the PowerShell Automation Guide.